
Last week I described the new Inbox we added recently, but there’s more little big improvements you’ll be happy to see. So here’s about the improvements we’ve recently made to Woodpecker, so you could send your emails and follow-ups the way you want, and so Woodpecker could catch all kinds of replies from your prospects.
1. Freeze your emails for holidays
When you’re on holiday, you’re not sending emails – simple as that. Now you can freeze your email account in Woodpecker for chosen days of the year. This way, you can be sure Woodpecker won’t send any emails at the time when you’re not there to react to incoming replies.
You can easily specify a list of dates when automatic email sending from your email account should be frozen.
Let’s say, you know that you’re on vacation from June 20th till June 26th this year. You can freeze your email account for this period, to make sure no prospects get your cold email or follow-up while you’re on vacation.
How to set it up?
1) Go to Settings -> EMAIL ACCOUNTS.
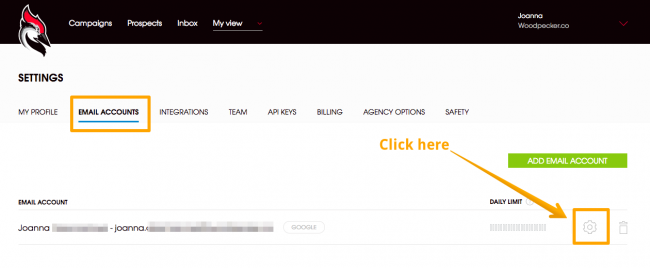
2) Edit your email account settings and scroll all the way down.
3) In the FREEZE EMAIL ACCOUNT section, choose the from & to dates using the calendar and clicking on a chosen date, or by typing in the date above the calendar to quickly jump four months ahead.
4) Set your time zone.
5) Click ADD to save the frozen period.
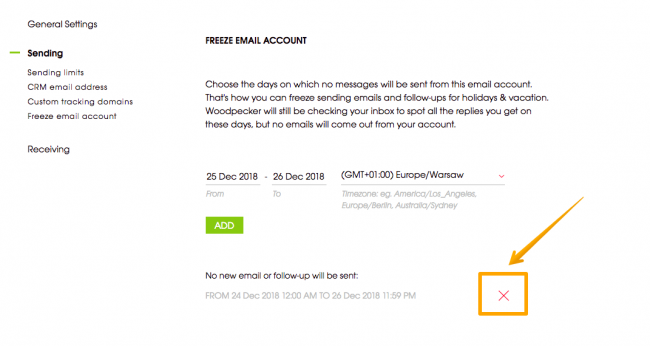
Underneath, you’ll see the list of the frozen periods for your email account. That means, in those periods of time, no emails or follow-ups will be sent from this email address. You can use the red X to remove a frozen period, if you’d like.
2. Set alias for your email address
Many people use aliases, even in non-automated email sending. That allows you to send messages from the same email box, but under a different email address.
Say, I want to send my emails from hello[at]woodpecker.co, but I want my prospects to see cathy[at]woodpecker.co as my email address in their inbox. I can set that up that now in my email account settings in Woodpecker.
How to set it up?
1) Go to Settings -> EMAIL ACCOUNTS.
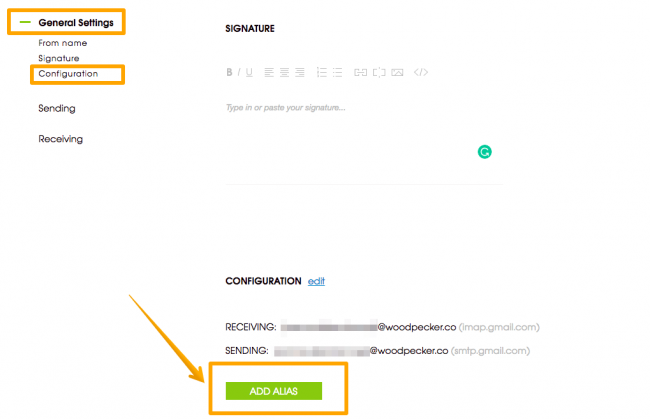
2) Edit your email account settings.
3) In the CONFIGURATION section, you’ll see the function to add alias.
4) Enter your alias email address and click ADD.
3. Inbox is now checked every 10 minutes
In case Woodpecker catches a reply from your prospect, the person is marked as REPLIED, or AUTOREPLIED and all automated follow-ups planned for this person are immediately stopped — that hasn’t changed.
Initially, Woodpecker checked automatically for new incoming replies every hour. Then, we switched that to every half an hour. After the latest update, your inbox is checked every 10 minutes to make sure all replies to your cold email campaigns have been caught quickly and that your prospects’ statuses have been updated accordingly.
Thanks to the frequent checking for new incoming replies, there is a very low probability that a follow-up will be automatically sent to someone after they have replied to you.
There’s nothing to set here, as this change has been already introduced for all accounts.
4. Filter campaign stats by imported file
In Campaign overview you can see stats of the campaign. In the PROSPECTS tab of the Campaign overview, you can see the exact prospects who replied to you, or opened your message.
But in Woodpecker you can add new batches of prospects’ contact data to your campaigns. Then, stats, the prospects from all batches will be mixed within the campaign. But now you can filter your prospects in a campaign by a chosen file of import.
So let’s say you want to see which prospects from your latest imported batch replied to your campaign.
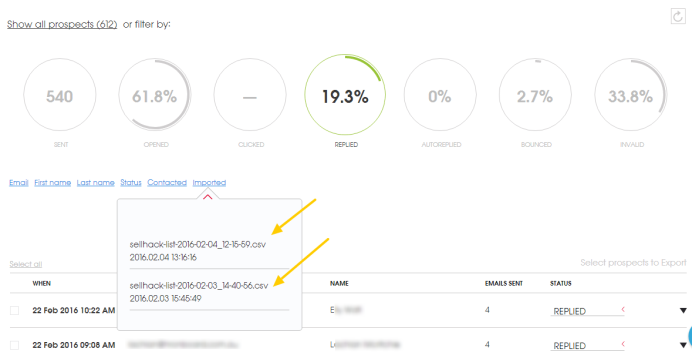
How to do that?
1) Go to Campaigns.
2) Choose the campaign you’re interested in and click on its name.
3) Choose the PROSPECTS tab within the Campaign overview.
4) Filter by: Imported.
5) Choose the imported file you want to filter by.
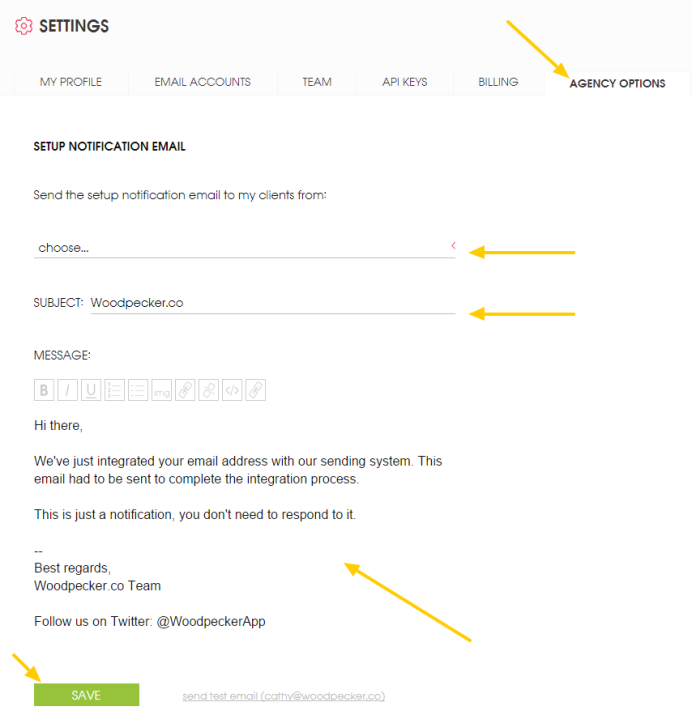
5. Woodpecker Agency for lead generation agencies
As you know, we offer a special for lead generation agencies. That involves a separate panel where, as an agency, you can conveniently switch between your clients’ companies.
So when an agency was connecting a client’s email address with Woodpecker, the client got a setup notification email from us.
But lead generation agencies usually asked about using Woodpecker as a white-label solution, and this setup notification message sent from our system revealed to their clients that they are using Woodpecker for automated sending of cold email campaigns.
That’s why recently, we’ve added a new feature in Agency Plan that allows agencies to customize the validation email: send a self-crafted message from their own email address.
If you’re on Agency Plan, you can set that up following these 5 steps:
- Go to Settings -> AGENCY OPTIONS.
- Choose your email address that you want the notification email to be sent from.
- Edit and customize your subject line.
- Edit and customize your notification message and signature.
- Click SAVE to save all the changes.
Once you have set that up, your clients will get the customized notification email from your agency address. They also won’t be aware of you using Woodpecker to send their emails, unless you tell them. 🙂
READ ALSO
7 Little-Known Woodpecker Features, and Do you Use Them?
Who doesn't love discovering new app hacks or using features that could help them? I'm sure there's a tech-savviness inside of most of you. And most of you would love to find out whether you use the app to the fullest. We have some app hacks for you. Let's find out if you know about them.
SaaS customer interviews: How to carry them out & what you can learn
When was the last time you actually talked to your customers? I don't mean a sales call or a demo. I mean actually talking about their business, your business, and how the two virtually affect each other. Our Outbound Sales team has just finalized their 3.5-month long project of customer interviews. Last week, they presented the results to the whole Woodpecker team. That inspired me to write about how you can do it as well at your SaaS company. So here it goes! See how to carry out customer interviews and what you can learn from talking to your clients.

Woodpecker Meeting III – We Can Call it a Tradition
Even though two months have lapsed, I'd like to recap you on the third Woodpecker Meeting that took place on May 25, 2018, a single day when we all meet together to celebrate and listen to team presentations. It has slowly but surely become a custom for the Woodpecker team. The first meeting was set up to celebrate reaching 150 premium users, the second one -- 800. Read more to find out what we discussed in the third one.