
Who doesn’t love discovering new app hacks or using features that could help them? I’m sure there’s a tech-savviness inside of most of you. And most of you would love to find out whether you use the app to the fullest. We have some app hacks for you. Let’s find out if you know about them.
***
Already have your account at Woodpecker.co and want to see the features? Log in.
Don’t have an account yet, but want to play with the features anyway? Sign up.
***
#1 Use hotkeys in the Inbox
Here’s a little something for you. Did you know that you can use several key combinations to move through your Inbox without using your mouse or touchpad? There are a couple of hotkeys like that.
- Use <Shift> + ↑ to move up to the next email.
- Use <Shift> + ↓ to move down to the previous email.
- Use <Shift> + ← to switch to the next page.
- Use <Shift> + → to go back to the previous page.
Now log in to Woodpecker, go to the Inbox and try out the hotkeys.
#2 Get a weekly summary emails
That’s a recent add-on to our app. Once a week you can get a weekly summary of your campaign activity. You will get an info about how many emails you sent, plus, how many opens and replies you got.
When you’re logged in, go to ‘Settings’, and in ‘My profile’ switch on the ‘Summary Emails‘ button.
Pretty convenient, right?
#3 Tag your prospects in bulk
Why change every prospect data one by one if you can do that in bulk? Save yourself time and energy on that. Go to the main ‘Prospects’ tab. Select the prospects you want to tag. The tag icon will appear in the top right corner of your prospect table. Click it and add your tag.
Complicated, huh? We have a help section about it: Help: Bulk tagging & untagging prospects >>
#4 Give prospects a way to opt out
No matter if you’re concerned with GDPR or not, you can be interested in including an ‘unsubscribe’ link to your cold email campaign, so that the prospects who are not interested can have an easy way to show you they don’t want to receive your emails.
After they click on the link, they get out of your email sequence and you don’t have to do that manually. The prospects who unsubscribed are automatically tagged “unsubscribed”.
Do you need to include GDPR-compliant unsubscribe option? Well, after clicking the ‘unsubscribe’ snippet, you’ll see that a field pops up on the right.
Tick the box and finish setting it up. Read a step-by-step guide on that: How to use GDPR encryption and unsubscribe? >>
Two things to bear in mind.
Not every one of you needs to comply with GDPR. Yet giving a way to opt out of your email sequence is a general requirement in many countries.
Quick Legal Guide to Email Outreach: 6 Rules to Follow >>
Remember it doesn’t need to be in a form of a link. It can be a short description, telling your prospects what to do if they don’t want any more emails from you.
Should I Give My Addressee a Way to Opt Out? >>
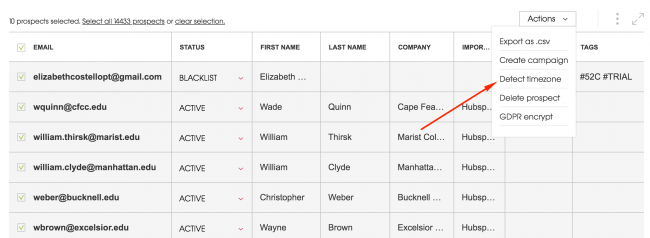
#5 Discover a prospect’s time zone
So you could easily plan your campaign for any prospect, Woodpecker can automatically deduce the time zone of your prospect. Go to ‘Actions’ in the list of prospects and choose ‘Detect timezone’ from the drop-down menu. Now, edit it out, so when you try to come up with the optimal time to send cold emails, you can consider the time zone of your prospect.
If you’re wondering how to schedule your campaign, check out these articles:
- What’s the Best Time to Send Email: Vol. 1 Stats >>
- What’s the Best Time to Send Email: Vol. 2 Different time zones >>
#6 Learn the difference between blacklists and blocked correspondence
There may come a time when you don’t want to avoid sending emails to one company. To make sure no one at that company gets an email from you ever, you may put their domain on a blacklist. For instance, you emailed them a while ago and you sealed the deal. There is no point in cold emailing them ever again.
Say you prepare a new cold email campaign and you accidentally put their email on the prospect list. They get an email from you. That makes you look unprofessional.
There’s a way of avoiding putting them in any future campaigns. Just blacklist their domain. To add them to a blacklist, go to ‘Settings’, click on the last tab ‘Safety’ and Click the ‘Add domain’ button. And that’s it. You let Woodpecker know to block them from any future campaigns.
Check out our help section: How to blacklist a domain? >>
Yet, there’s another case in which you may block correspondence at Woodpecker. This time you don’t block outcoming emails, but the incoming ones. There are situations in which you may want to block incoming emails.
Emails that are in no way related to your campaign appear in your Woodpecker Inbox. Those can be emails from your coworkers. You don’t need to see them in the Woodpecker Inbox because it spoils your workflow.
You have three options to block incoming correspondence. You can block a single email, an email address or domain. Head to our help section to learn how to do it: How to block correspondence? >>
#7 Switch to beta to grow Woodpecker with us
We’ve recently made widely available the beta version for those of you who want to become our beta testers. We have a few testers on board (thank you, guys!) but it would definitely make Ania, our UX/UI designer happy if any new person would like to sign up. Just message Ania via our contact form and she will get you started.
Want to be the first to learn about new releases?
If you want to keep being posted about the Woodpecker feature releases, check out the Product Roadmap we have on the website. Go here >>
Or like us on LinkedIn. We announce new feature releases there.
READ ALSO
2 Quick Tricks to Speed Up a Cold Email Campaign in Woodpecker
I get it. You've connected your email address, wrote an outstanding email sequence, uploaded a long list of verified prospects and conducted a 5-minute campaign audit to check if everything's right, but Woodpecker has sent very few of your emails so far. Let's go through all the steps together and discover what can be improved to boost your sending.

Getting Started With Outbound Outreach: Are You on the Right Track?
Getting a good grasp of email deliverability from the very beginning is essential not only for the future success of your campaigns but also for your domain safety. I’ve conducted some research to find out what cold email senders should pay attention to when they want to increase their cold email deliverability rate. Let’s see what I’ve found out.
How to Sync Woodpecker’s Prospect Base with Your CRM and Other Apps
This week, Woodpecker successfully finalized integration with PieSync. As our users, you've just got the ability to effortlessly sync your CRM contact base (or contacts you store in other cloud applications) with your prospect base in Woodpecker. In other words, you can now regain all the time spent on importing prospects and exporting leads back and forth between Woodpecker and other apps that you are using to manage your sales processes.